Not Just Another AWS EC2 Tutorial
EC2 is one of the most commonly used AWS services. From running basic development and testing application instances to hosting multi-tier stacks, EC2 offers a rich set of IaaS (Infrastructure as a Service) capabilities that not only let you stand up the resources quickly but also handle ongoing maintenance easily from starting/stopping instances to on-demand scaling. In this tutorial, we will cover EC2 basics, how to create an instance, some best practices, and tips.
EC2 Overview
EC2 Terminology
Lets first understand some common terms.
| Term | Meaning |
|---|---|
| Instance | A virtual server running within the AWS cloud. |
| Amazon Machine Image (AMI) | A virtual machine image used to create an EC2 instance. |
| Instance Type | It controls the (virtual) hardware configuration, such as CPU and memory. |
| EBS Volume |
The file system for the EC2 instance. |
| Key Pair | An SSH key pair used to connect to an EC2 instance. |
| User data | A run once script used to do the one-time setup (such as install CloudWatch agent). |
Creating an EC2 Instance
It is fairly easy to create an EC2 instance by following these simple steps.
- Go to the EC2 Console and click on Launch Instance.

- Choose an appropriate AMI.

- An AMI provides the base image for the Instance. It can be just the base operating system or a full blown stack.
- You can choose from AWS supplied AMIs, community AMIs, Marketplace or even private AMIs that are produced by your organization and meant to be used by the organization only.
- The Marketplace offers third-party AMIs, such as appliances like the security scanners.
- Choose an appropriate Instance Type.
Tip: Take advantage of the FREE tier eligible Instance Type as much as possible.
- Be conservative when choosing the Instance Type. You can always change it later (both higher or lower). However, the advantages of starting lower are
- Lower cost
- You can actually benchmark and analyze whether you really need a higher capacity instance type.
- Be conservative when choosing the Instance Type. You can always change it later (both higher or lower). However, the advantages of starting lower are
- Specify the Instance Configuration Details.

- Specify the number of instances to provision.
- You can request Spot Instances. A spot instance is obtained based on price bidding and is usually much cheaper (a.k.a. spot price) than a regularly priced EC2 instance. You acquire one when you win the bid. But, you may lose your instance later if your bid price is lower than the spot price). Since a spot instance is not guaranteed to be always available, these are typically suitable for non-time sensitive workloads, such as background jobs.
- Choose appropriate network details, such as VPC and optionally the subnet. You can also choose to override the public IP assignment setting (applicable for VPC public subnets only).
- Use IAM role to grant the EC2 instance access to AWS resources. For example, if you would be running an application on this EC2 instance that will try to access S3, you can assign an IAM role to the EC2 instance that permits the required S3 access. This way you do not have to store the access and secret keys on the EC2 file system. If you are not familiar with this aspect, please read Understanding an IAM Role.
- You can specify the shutdown behavior.
- The Enable termination protection flag can be used as an extra measure to protect important instances, such as infrastructure servers.
- The User data section can be used to specify a script that is run once on the first boot of the instance. It is typically used to do one-time configuration, such as installing the CloudWatch agent.
- Add storage to the instance.

- EC2 Instance uses Elastic Block Store (EBS) volumes for the filesystem. Specify an appropriate size.
- The Volume Type specifies the type of storage to use.
- GP2 is SSD-based storage, which is good enough for many types of workloads. It also supports burst capabilities to deliver higher IOPS to enable handling of the temporary increase in demand.
- For guaranteed IOPS, use the IO1 type. This is useful for I/O intensive components like databases.
- Magnetic volumes, which are useful for sequential access, such as ETL workloads.
- You can also choose to encrypt data at rest, which is often required for security and compliance purpose.
- Specify any tags to be associated with the instance. At a minimum, specify the Name tag, which is used to assign a logical name to the EC2 instance. You can also use tags for other purposes, such as ownership identification, billing, etc.

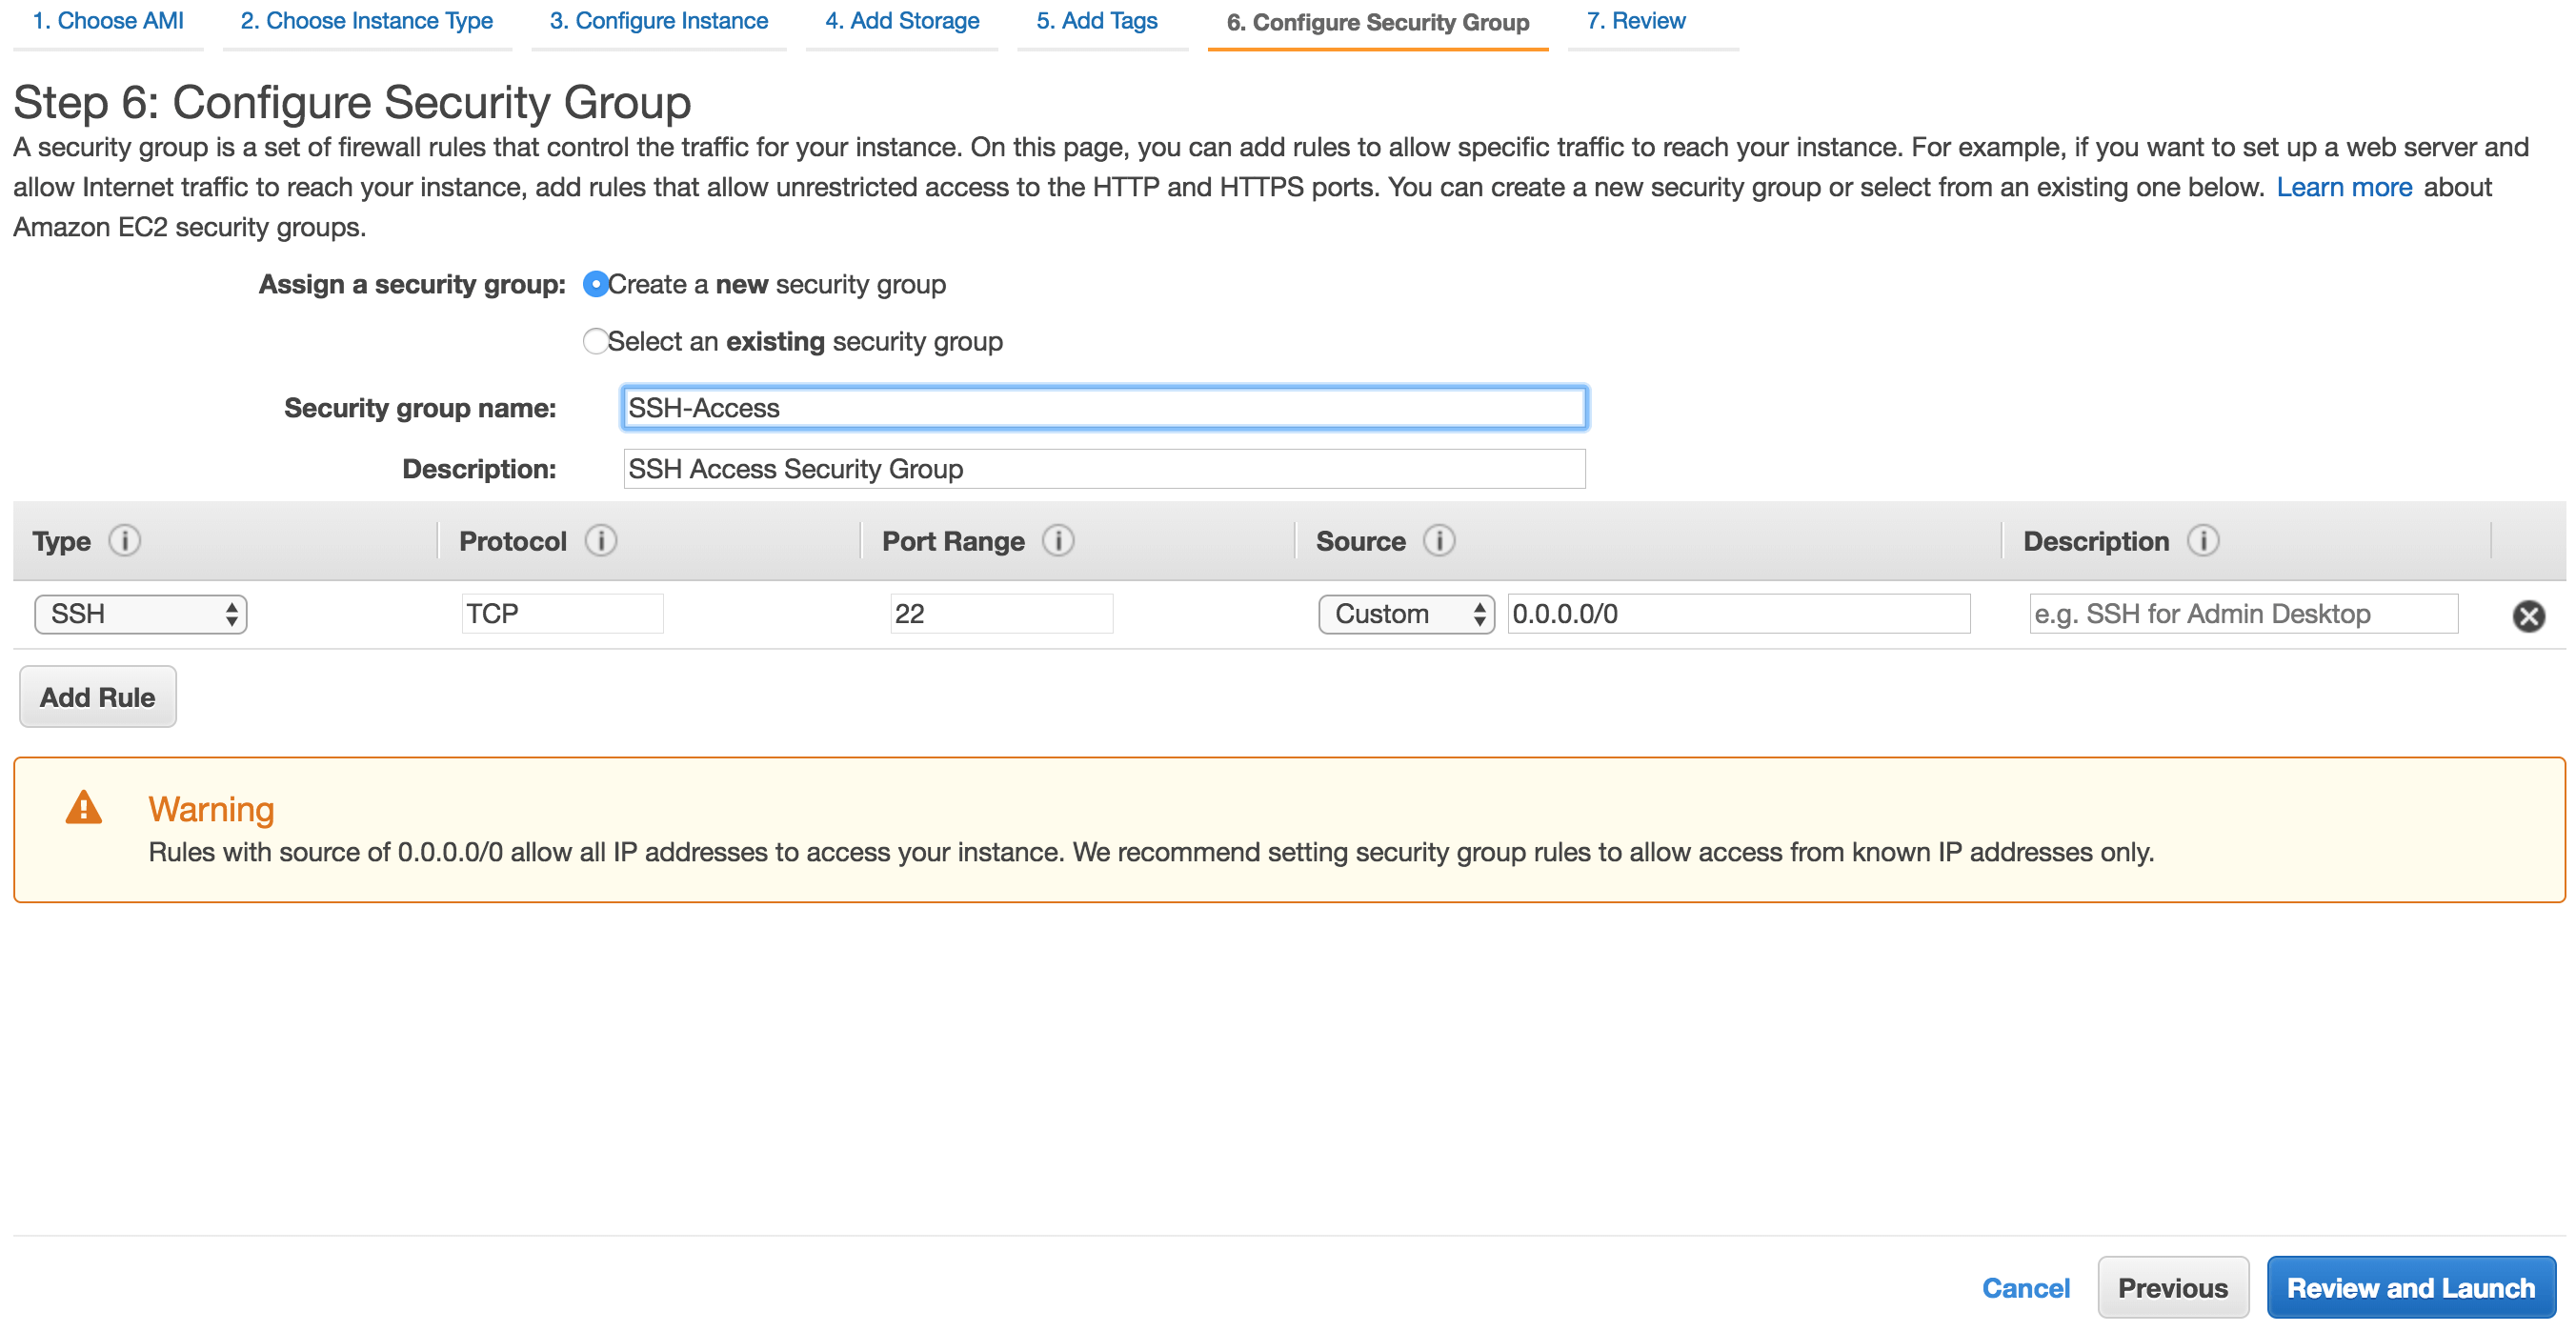
- Specify a Security Group to be associated with the instance. It is a virtual firewall that controls access by specifying the allow rules. For example, which ports are accessible and who can access. In the screenshot below, anyone can access the SSH port. If you are not familiar with security groups, please read Understanding Security Groups.

- Review the details and launch the instance. You can also make changes to the appropriate section by clicking the respective Edit link.

- As part of the launch, you will be prompted to either create a key pair or use an existing one.

- A key pair is used to connect to the EC2 instance via SSH for Linux and for Windows it is used to obtain the password.
- If this is the first instance launch, you can choose to create a key pair. In that case, make sure to store the generated private key file in a secured location.
- The instance will be created now. Usually, this takes a few minutes only.

- Once the provisioning is successful, the instance will be in the running state.

- Now you can review the details about the instance by clicking on the instance in the EC2 instances list.

- The row shows high-level information, such as the name, instance identifier, type and so on. You can also see the public IP and DNS name here.
- The lower part of the screen shows more details, such as AMI, storage information, private IP, VPC, subnet and so on. It is important to remember that the private IP of the EC2 instance does not change upon reboot and will be there for its lifespan. However, the public IP will typically change on every reboot (unless you assign an Elastic IP). Hence, for most of your application stack configuration and inter-component communication where the components can reach each other via private IP, prefer using the private IP/DNS name.


Ongoing EC2 Management
EC2 makes it easy to do post provisioning management tasks. Here are some commonly performed operations.

- Start/stop the instance
- Terminate instance
- Change Security Groups
- On-demand scaling: As your application demand changes, you can adjust your infrastructure to handle the load. For example, for peak times you could increase the capacity and when the demand goes down decrease the capacity. There are 2 primary ways of achieving this.
- Vertical Scale in/out: Vertical Scaling refers to changing the configuration of the existing instance(s). For example, increasing CPU/memory would be a scale out. Whereas, decreasing CPU/memory when the demand goes down will be a scale in.
- Horizontal Scale in/out: In this, you would add more instances (typically, same configuration) to meet the increase in demand and take these out when the demand goes down. These instances will be behind a load balancer (LB) and the users will be sending their traffic to the LB. Thus, it is transparent to them. But, it is an important capability for application service providers. A popular variant of this is auto-scaling, which performs the scale in/out based on an event, such as CPU utilization.
EC2 Best Practices
Following are some commonly used EC2 best practices.
- Be conservative when choosing the Instance Type. You can always change the Instance Type later.
- Shutdown the EC2 instances when these are not in use to save on costs.
- Use a logical name and prefer following a naming convention so that instances can be easily identified.
- Use tags for additional classification, such as ownership identification and billing. Tags are also often used for DevOps and automation purpose.
- Do not assign public IP unless the instance is intended to be public facing.
- Use GP2 as a reasonable starting point unless you know for sure the storage type you want to use. Minimize use of IO1 and even when choosing IO1 use the minimum number of IOPS that will meet your application needs. This will help in keeping your costs low.
- Use encrypted EBS volumes whenever possible. Often the encryption overhead is minimal.
- Be conservative when specifying the Security Group rules and grant only the required access.
- Create Security Groups in advance and avoid creating these on the fly as part of provisioning resources, such as creating an EC2 instance.
- Use specific Security Groups, such as based on application tier and avoid clubbing rules for different tiers/components or purpose into one Security Group.
- Prefer using private IP/DNS name for configurations, whenever possible as that does not change for the lifespan of the instance.
Additional Reading
Happy learning!
– Nitin
Enhance your AWS skills with these hands-on courses for real-world deployments.
![]()
![]()
Also published on Medium.